
gdb script (Python API)
디버깅을 자동화 시킬 수 있도록 gdb는 script 기능을 제공합니다. python 모듈 형태로 사용이 가능하기 때문에 편리하면서도 강력한 기능들을 사용할 수 있습니다.
기본적으로 import gdb를 통해 import한 뒤, 실행할 때는 gdb -x <script.py> 형태로 실행할 수 있습니다.
Index
gdb.execute
gdb.execute()를 통해 gdb에 원하는 명령어를 실행할 수 있습니다.
import gdb

# main이라는 실행파일을 열기
gdb.execute("file ./main")

# main 함수에 breakpoint 걸기
gdb.execute("b *main")

# 실행
gdb.execute("run")

# 레지스터 값 보기
gdb.execute("i r $rax")
gdb.execute 는 gdb의 명령어를 그대로 실행시키기 때문에, 기존의 gdb 명령어만 잘 익히고 있어도 바로 script를 작성할 수 있습니다.
to_string parameter
result = gdb.execute("i r $rax", to_string=True)
print(type(result))
print(result)

> 수행 결과
<class 'str'>
rax            0x1c                0x1c
to_string 인자를 True로 설정해주면 해당 수행 결과를 터미널에 출력하는 대신 문자열로 반환해 줍니다. 명령어 수행 결과를 python으로 받아올 때도 쓰이지만, 터미널에 불필요한 출력물을 없애는 용도로도 자주 사용됩니다.
레지스터의 값이나 심볼을 가진 변수의 값을 가져올 때 편리한 방법입니다. 그 외 특정 메모리 주소에 접근해서 값을 읽어오는 것 또한 가능합니다.
gdb.parse_and_eval
# 레지스터의 경우 $ 붙이기
rax = int(gdb.parse_and_eval("$rax"))

# variable이라는 변수명의 값 가져오기
variable = int(gdb.parse_and_eval("variable"))

# 메모리 주소에 접근
val = int(gdb.parse_and_eval("*(long long*)0x404040")
gdb.Breakpoint
gdb.execute(f”b *{address}”)의 형태로도 breakpoint를 설정할 수 있지만, gdb script에서 자체적으로 제공하는 기능이 있습니다.
gdb.Breakpoint를 이용하면 conditional breakpoint를 설정하거나, Breakpoint 내부의 stop 메소드를 자체적으로 정의하여 breakpoint가 걸렸을 때 수행할 동작을 정의하는 등 보다 고급진 역할을 수행할 수 있습니다.
물론, gdb 쉘에서도 조건부 bp 정도는 걸 수 있지만, 디버깅 중인 프로세스의 논리가 아닌 python에 작성된 논리에 따라 조건부 bp를 거는 것 또한 가능합니다.
breakpoint 설정
# main 함수에 bp 설정
gdb.Breakpoint('main')

# 0x401010에 bp 설정
gdb.Breakpoint('*0x401010")
조건부 breakpoint 설정
bp = gdb.Breakpoint("my_function")
bp.condition = "x == 42"

bp1 = gdb.Breakpoint("*0x401010")
bp1.condition = "ptr != NULL"

# 심볼이 없을 경우, 레지스터나 메모리에 직접 접근하여 작성 가능
bp = gdb.Breakpoint("0x401010")
bp.condition = "$rax == 42"

bp1 = gdb.Breakpoint("0x401011")
bp1.condition = "*(int*)0x404040 == 0x42"
특수한 breakpoint 설정하기
일반적인 breakpoint 말고도 hardware breakpoint나 watch point등도 설정할 수 있습니다.
type parameter를 설정하면 됩니다.
# 표준
gdb.Breakpoint('main', type=gdb.BP_BRAKPOINT)

# hardware breakpoint
gdb.Breakpoint('*(int*)0x404040, type=gdb.BP_HARDWARE_BREAKPOINT)

# watchpoint (read/write)
gdb.Breakpoint('*(int*)0x404040, type=gdb.BP_WATCHPOINT)

# watchpoint (only read)
gdb.Breakpoint('*(int*)0x404040, type=gdb.BP_WATCHPOINT, internal=False, watch_read=True)

# watchpoint (only write)
gdb.Breakpoint('*(int*)0x404040, type=gdb.BP_WATCHPOINT, internal=False, watch_write=True)

# catchpoint
gdb.Breakpoint('throw', type=gdb.BP_CATCHPOINT)
type을 따로 설정하지 않으면 gdb.BP_BREAKPOINT로 설정됩니다.
class 정의하여 내가 원하는 breakpoint 정의하기
원하는 형태의 breakpoint를 class로 정의해둔 뒤 써먹는 방법을 자주 사용합니다. 특히 stop 메소드를 정의하면 breakpoint가 걸릴 때마다 해당 함수를 호출시켜서 bp가 걸렸을 때 원하는 로직을 추가할 수도 있습니다. 약간 Hooking하는 느낌이랄까요.
참고로 stop한 시점에서 실행과 관련된 명령어는 수행할 수 없습니다. gdb.execute(”run”), gdb.execute(”continue”) 등
함수에 Hooking하여 인자 값을 염탐하는 중단점
class hook_info_param(gdb.Breakpoint):
	def __init__(self, address):
		super(hook_info_param, self).__init__(spec=f"*{address}") # spec은 bp 거는 위치를 의미합니다. 기본 parameter이므로 'spec=' 굳이 안써도 되긴 함

	def stop(self): # bp 걸릴 때마다 stop 호출
		rdi = int(gdb.parse_and_eval("$rdi"))
		rsi = int(gdb.parse_and_eval("$rsi"))

		print(f"1st param: {rdi}")
		print(f"2nd param: {rsi}")

		return False

hook_info_param(0x401020) # 후킹할 함수 주소를 넣어줌
n번 이상 hit할 경우에만 중단하는 중단점
class Hit_until_max(gdb.Breakpoint):
	def __init__(self, address, n):
		super(Hit_until_max, self).__init__(spec=f"*{address}", type=gdb.BP_BREAKPOINT)
		self.hit_count = 0
		self.hit_max = n
		self.loc = address

	def stop(self):
		self.hit_count += 1

		if self.hit_count < self.hit_max:
			return False # False 반환하면 stop하지 않고 계속 실행
		else:
			print(f"Breakpoint at {self.loc} hit {self.hit_count} times")
			return True # True를 반환하면 중단

my_bp = Hit_until_max(0x401000, 100) # 100번 hit할때까지 중단하지 않는 중단점
변수 값이 바뀔 때 바뀐 값이 100일 경우에만 중단하는 쓰기 watchpoint
class watch_until_100(gdb.Breakpoint):
	def __init__(self, address):
		super(watch_until_100, self).__init__(spec=f"*(int*){address}", type=gdb.BP_WATCHPOINT, internal=False, watch_write=True)
		self.loc = address

	def stop(self):
		value = int(gdb.parse_and_eval(f"*(int*){self.loc}"))
		if value == 100:
			print(f"Watchpoint at {self.loc} triggered")
			return True
		else:
			return False

my_wp = watch_until_100(0x404040) # 해당 값(4byte)이 변경될 때 100이 될 때까지 중단하지 않는 watchpoint
gdb.FinishBreakpoint
함수의 종료 시점에 bp를 걸 수 있는 기능입니다. bp를 걸기 위하여서는 주소가 아닌 frame이 필요하며, 해당 함수가 스택 프레임 위에 있지 않는 시점에서 bp를 걸 수 없습니다. 따라서 FinishBreakpoint는 먼저 함수 호출 시점에 bp를 걸어 놓고 호출되면 그 때 Frame을 가져와서 FinishBreakpoint을 거는 방식을 주로 사용합니다.
함수의 인자 및 retval 모두 얻는 후킹
class hook_info_retval(gdb.FinishBreakpoint):
	def __init__(self, frame, function_name):
		super(hook_info_retval, self).__init__(frame)
		self.function_name = function_name

	def stop(self):
		retval = int(gdb.parse_and_eval("$rax"))
		print(f"{self.function_name} return")
		print(f"\tretval: {retval}")
		return False

# 심볼이 살아 있는 경우입니다. 없는 경우는 address 기반으로 bp를 걸어야 합니다
class hook_info_param_retval(gdb.Breakpoint):
	def __init__(self, function_name):
		super(hook_info_param_retval, self).__init__(function_name)
		self.function_name = function_name

	def stop(self):
		frame = gdb.selected_frame() # 현재 함수의 frame을 가져옵니다.
		fb = hook_info_retval(frame, self.function_name) # FinishBreakpoint를 설정합니다.

		printf(f"{self.function_name} called")
		rdi = int(gdb.parse_and_eval("$rdi"))
		rsi = int(gdb.parse_and_eval("$rsi"))
		print(f"\t1st parm: {rdi}")
		print(f"\t2nd parm: {rsi}")
		return False

hook_info_param_retval("my_function")
ptrace 형식의 anti-debugging 무력화
class forge_retval(gdb.FinishBreakpoint):
    def __init__(self, frame):
        super(forge_retval, self).__init__(frame, internal=True)

    def stop(self):
        gdb.execute("set $rax=0") # retval을 0으로 위조하여 ptrace가 성공한 것처럼 함
        return False

class disable_ptrace(gdb.Breakpoint):
    def __init__(self):
        super(disable_ptrace, self).__init__("ptrace")

    def stop(self):
        frame = gdb.selected_frame()

        fb = forge_retval(frame)

 disable_ptrace()
gdb.selected_inferior
Inferior라 함은 gdb에서 디버깅 대상의 단위를 의미하는 객체입니다. 즉 일반적으로는 디버깅 중인 프로세스를 의미합니다.
selected_inferior는 현재 디버깅하고 있는 inferior를 가져옵니다. 디버깅 중인 프로세스에 관한 정보를 얻거나 관여할 수 있는 객체라고 보면 좋을 것 같습니다. 뭐 이것 저것 많이 있는 것 같지만, 주로 값을 읽거나 쓸 때에 자주 사용하는 기능입니다. gdb.execute(”set”) 형식의 명령어나 parse_and_eval 등으로 읽거나 쓸 수 있지만, 한계가 뚜렷합니다. 예를 들어서 2000바이트 값을 parse_and_eval로 읽어오거나 set 명령어로 쓸려면 꽤나 복잡한 과정을 수행해야 합니다.
inferior를 사용하면 해당 작업을 수월하게 할 수 있으며, python에서는 byte array 객체로 쓰기 및 읽기를 할 수 있다는 것도 큰 장점입니다.
# 값 읽기
inferior = gdb.selected_inferior()
memory_val = inferior.read_memory(0x600000, 10) # 0x600000주소에서부터 10바이트를 읽어옴

# 값 쓰기
inferior = gdb.selected_inferior()
new_val = b"\x90\x90\x90\x90\x90"
inferior.write_memory(0x600000, new_val) # 0x600000주소의 메모리에 new_val 값을 쓰기
gdb script 예제
사실 해당 문제를 해결하는 것에 gdb script가 필요하지는 않으며, 해당 문제를 푸는 것을 목표로 하는 것은 아닙니다. 다만, 위 문제의 ptrace 기반 anti-debugging을 우회하는 실습을 수행해 보고자 합니다.
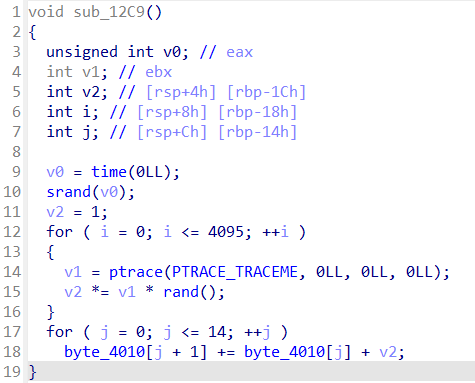
위 문제의 sub_12C9에 있는 반복적인 ptrace 호출에 대하여 디버깅 환경에서도 return 값을 0으로 만들어서 정상 환경과 동일하게 작동하게끔 하는 것이 목표입니다.
anti-debugging을 무력화 시킨 뒤에 디버깅 목적인 byte_4010의 16바이트 값을 가져와 확인하는 것까지 수행해 보겠습니다.
먼저 ptrace의 최초 실행 시에 정상 환경에서의 return 값은 0이 되어야 합니다. 하지만, 정상 환경에서도 그 이후의 ptrace 실행 시에는 -1을 return합니다. 디버깅 환경에서는 모두 -1을 return하게 되므로 정상 환경과 동일하게 맞춰주기 위해서는 최초 1회에만 return 값을 0으로 바꾸고 이외에는 breakpoint를 disable하게 해주어야 합니다.
그 이후에는 byte_4010에 값이 다 들어간 시점에 bp를 걸고 값을 확인하면 됩니다.
완성된 script입니다.
import gdb

ge = gdb.execute # gdb.execute에 대한 숏컷 매크로 정의

ge("file ./prob") # 문제 파일 불러오기

class forge_retval(gdb.FinishBreakpoint):
    def __init__(self, frame, bp):
        super(forge_retval, self).__init__(frame, internal=True)
        self.bp = bp

    def stop(self):
        self.bp.delete() # 설정한 bp를 없앰
        ge("set $rax=0")
        return False

class disable_ptrace(gdb.Breakpoint):
    def __init__(self):
        super(disable_ptrace, self).__init__("ptrace")

    def stop(self):
        frame = gdb.selected_frame() # 현재 함수의 스택 프레임 가져옴
        fb = forge_retval(frame, self) # 함수 종료 시점에 breakpoint 걸기
        return False

class get_16byte(gdb.Breakpoint):
    def __init__(self, address, target_memory):
        super(get_16byte, self).__init__(f"*{address}")
        self.target_memory = target_memory

    def stop(self):
        print("hit")
        inferior = gdb.selected_inferior()
        result = bytes(inferior.read_memory(self.target_memory, 16)) # 0x4010에서 16바이트 읽기
        print("result:", result.hex())

disable_ptrace()
image_base = 0x555555554000 # gdb 위에서 실행되는 바이너리는 image base가 0x555555554000으로 고정
get_16byte(image_base+0x1391, image_base+0x4010)

ge("run") # BP 설정 다 했으니 실행
exit() # 딱히 의미 없음
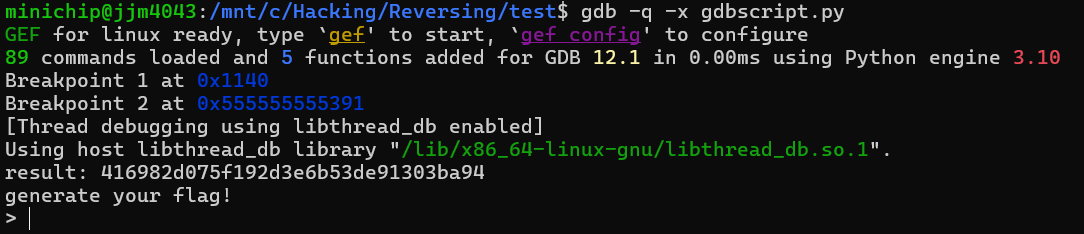
실행하면 위와 같이 hex string으로 출력한 결과가 잘 나오는 것을 확인할 수 있습니다.
위 예제 말고도 1 byte brute-force를 수행하거나, 실행 중간에 바이너리 무결성 검사 등을 우회한 뒤에 바이너리를 패치한다거나, Virtualize된 바이너리의 동작을 분석하기 위해 Hooking 코드를 작성한다거나, 엄청나게 큰 규모로 메모리 값을 읽거나 쓰는 경우나, self-modyfing 형태의 난독화를 해제한다던가 등 굉장히 다양한 용도로 사용될 수 있습니다.